Monday, May 21, 2012

First Harvest of Potatoes

Yesterday I went out with my basket and dug up the first half of my potatoes. Next year, I will use much more compost for a greater yield, but the first harvest wasn't too shabby for container potato plants. There were Purple Majesty, Banana Fingerling, and Yukon Gold Potatoes.

Digging for the potatoes is half the fun, like an Easter egg hunt for grown ups. I emptied one container at a time into a plastic bag and then dug around for buried treasure as I added the soil back into the container.

Of course, the other fun part about growing your own potatoes is figuring out how you will eat them. These potatoes are so tender and crisp inside, and on the outside, the thin skin so very delicate.  My favorite way to prepare them is simply to roast them in olive oil with fresh herbs and garlic.

Growing potatoes at home gives me such a thrill that I think I will grow them every year from now on. I ordered special seed potatoes this year by mail, but next year I may just use organic potatoes from the Natural Foods Co-op where I live.

Tuesday, May 15, 2012

New Orleans: A Dream Come True

Have you ever been drawn to a place and then fallen head over heels with it once you finally made it there? New Orleans was like that for me. A huge romantic, for me this city seemed to have everything that could be desired in a place: gorgeous architecture, stellar music, Southern hospitality but big-city sophistication, a fascinating history and of course, amazing food.

I headed off to explore Nawlins last week with a friend. Let's start with the food, shall we?

Favorite Appetizer: This is an Alligator Sausage and Shrimp Cheesecake from Jacque-Imo's. It's a savory cross between a cheesecake and a quiche, smothered in a creamy sauce. To die for!

Favorite Dinner: Crawfish Ettoufee, from the same place. Served alongside Cornbread, red beans and rice and corn maque choux, this was a genuine Creole experience - and soooo good!
Best Touristy Place to start your day: Cafe du Monde for some beignets topped with powdered sugar. With a tiny "large" glass of freshly squeeze orange juice, it was a wonderful (if overpriced) was to start exploring the French Quarter.
Dessert of choice in these parts: Pralines! Don't even bother looking for chocolate, cause this is Praline territory.
Biggest sandwich I have ever eaten: Muffaletta from Central Grocery. I didn't realize that "whole" meant it was served on a whole loaf of bread! We didn't finish this baby, but made a homeless guy's night.
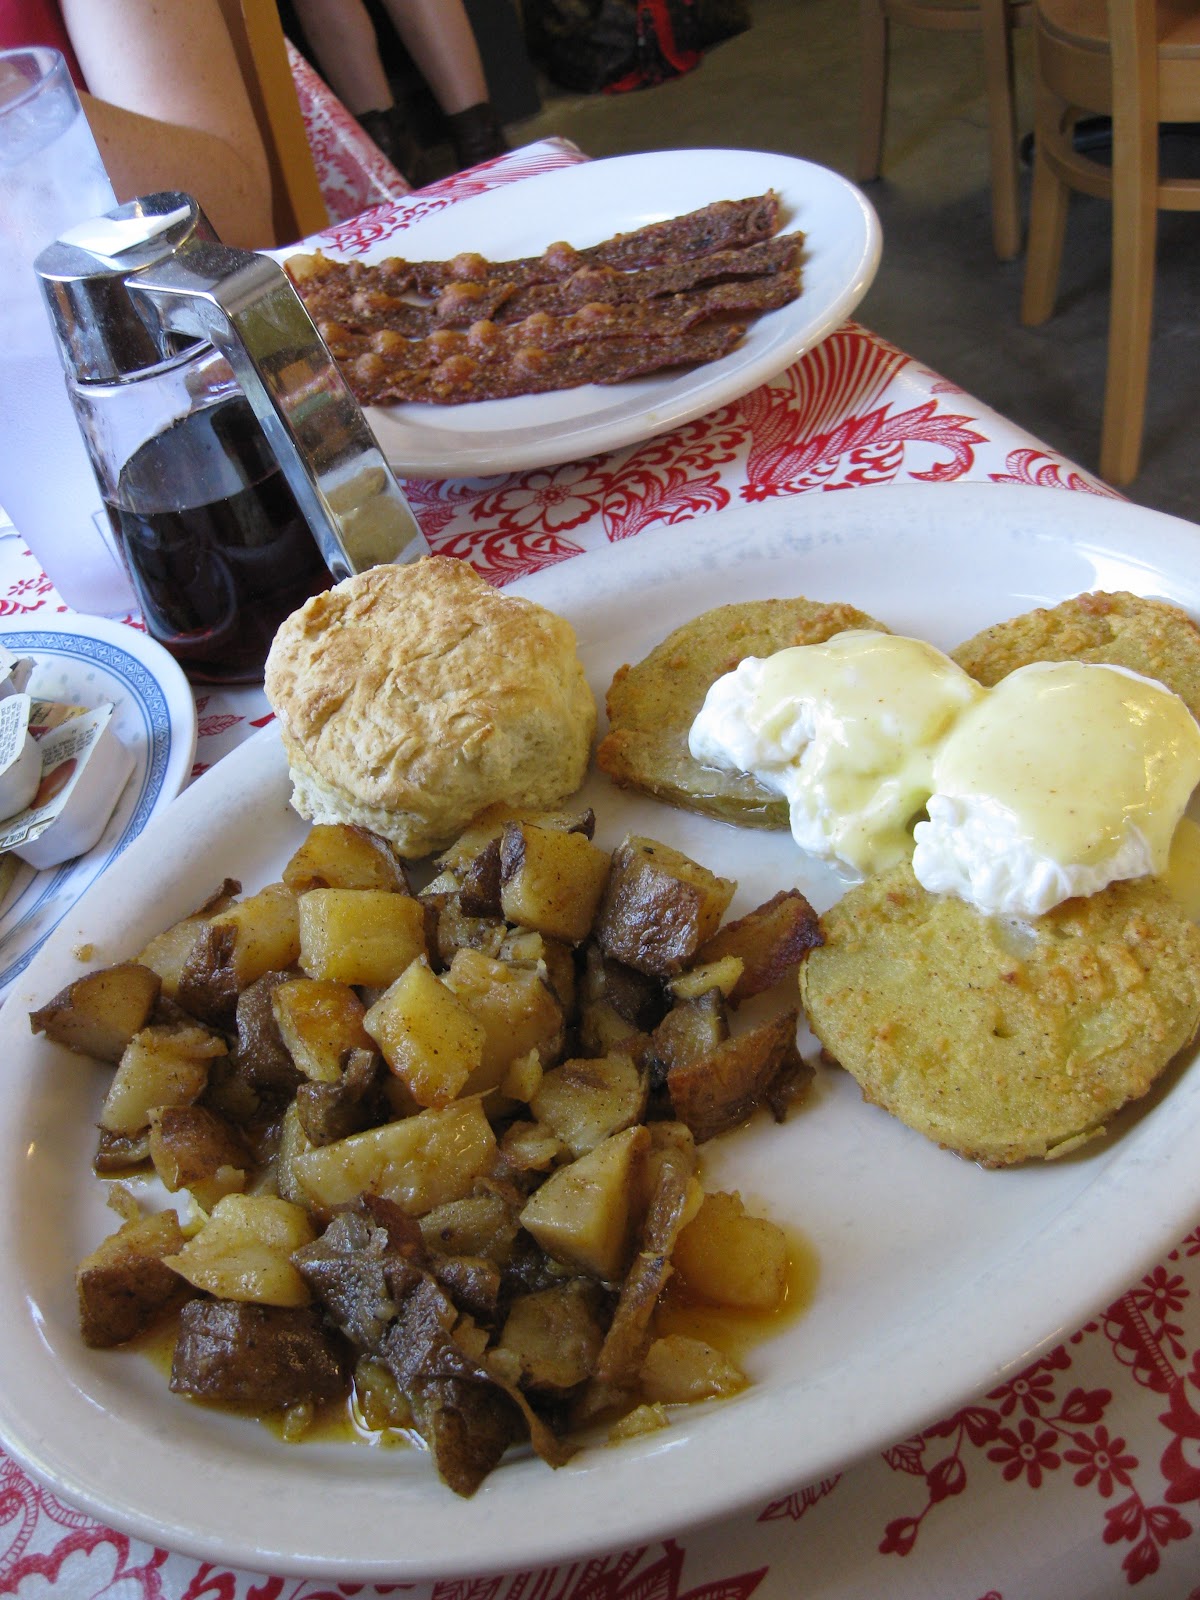
Best "I'm in the South!" breakfast: Elizabeth's, where we ate praline bacon (I know!), fried green tomatoes, poached eggs, potatoes, and a biscuit. Swoon!

Best "I am way too underdressed to be here" lunch: Emeril's Restaurant. Despite our tennis shoes and shorts in a sea of suits, they didn't turn us away for lunch, so we got to enjoy this combination of Fried Organic Chicken, Sweet Corn-Belgian Waffle, Watermelon Slaw and Crystal Hot Sauce Syrup.

Best dessert: Emeril's Banana Cream Pie. Jacques Pepin named it "the best thing I ever ate in New Orleans", and the man has got a point there. It is one mean pie.


Best "late night dessert to eat when you're hanging out on Frenchmen Street and have a hankering for something sweet": Bread pudding in praline sauce from The Praline Connection.

Best "Dessert for Breakfast" dish: Bananas Foster French Toast from Surrey's. My stomach almost exploded by this time, but my friend finished hers. I am in awe!

Besides the food, how about some gorgeous shots of New Orleans?

Jackson Square


The French Quarter - so picturesque!

This is where we stayed: A typical house in the Bywater, with shutters, white pillars and palms.

St. Louis Cemetery #1: The first cemetery where they decided to built above-ground vaults. Before that, the bodies they buried on the river bank floated up when the city flooded. Imagine corpses floating down your street and you can see the wisdom of these vaults.
Public Art paying tribute to jazz


This mansion in the Garden District used to belong to Anne Rice. It's easy to see how the city inspired her aesthetic.


Houmas House, a real plantation. We ate lunch on green velvet chairs, strolled the gardens, 
had the best tour guide ever (a la Scarlet O'Hara) and stood under 500 year old oak trees 
draped in grey moss. 

If you ever get the chance, go to New Orleans. Filled with an indescribable positive energy, I can't imagine anyone not falling in love with it.

Thursday, May 3, 2012

Lasagna Gardening

My last post was all about Biba's famous lasagna. Today I wanted to talk about lasagna gardening.

Maybe you have heard of lasagna gardening before. It's called that because it consists of creating layers of organic material. Last fall, we purchased three cedar wooden frames in order to create raised beds in our backyard. We don't have a space for a garden, per se, so we had to create one... where the lawn used to be.

How do you turn a patch of lawn into a gardening space? We chose to use lasagna gardening. We started by putting our wooden frames on the lawn, being careful not to put them on top of any sprinklers. Next, we put down a layer of wet newspaper over the grass. On top of the newspaper we piled compost, straw, coffee grounds, shredded leaves.... Lots of layers of organic matter, like a lasagna. The grass essentially composts itself, aided by worms who eat the organic matter and enrich the soil with their castings. Here were our beds when we started:


Then, we simply let our "lasagna" sit over the fall/winter season. The lack of rain caused the process to go a little slower decomposition than we'd expected, but sure enough, almost all the grass died off and we now have a nice, compact area in which to grow vegetables.

Here our beds were in early spring when we prepared the first bed to plant our early veggies (like lettuce and peas and carrots) by simply adding garden soil and a top dressing of compost, plus soaker hoses to water them:

And here is how it looks now, with all beds filled, including tomatoes, peppers and beans:


This weekend holds even more gardening when we head over to my parent's larger plot to plant the heat-loving kinds of things that need lots of room (melons, pumpkins, winter squash, etc.)

Tuesday, May 1, 2012

Lunch at Biba

If you are ever in Sacramento and love authentic Italian cooking, or need an elegant place to enjoy a meal, you may want to check out Biba. The owner, Biba Caggiano, has written cookbooks on Italian cooking and is a local food celebrity. Her restaurant recently got a facelift, and my husband and I headed over for one afternoon last week to celebrate his birthday and check out the lunch menu at the remodeled location.

We went on a Friday. This is a very important detail, because Biba's most famous dish of all is her lasagna, which is made only on Thursdays and Fridays. This masterpiece consists of ten layers of spinach noodles, intertwined with Bolognese meat ragu and creamy bechamel sauce.

The texture of this lasagna was remarkable and unique. Cutting into it with a fork and knife felt like slicing cleanly through delicate tissue paper. Although these two squares don't seem overwhelming at first glance, the taste was very rich, and I was unable to finish more than half of my plate at one sitting. Leftovers, however, tasted just as good the next day!

Part of my reduced appetite was due to an appetizer that my husband ordered - mozzarella topped with roasted peppers, arugula, and olive oil.

Again, the texture was amazing in this dish. The skin around the edge of the ball of mozzarella was firm, but the center of it was soft and creamy. I totally dig that textural contrast - I mean, I'm the kind of girl who actually enjoys eating the skin that forms on the top of pudding. (Oops, did I just admit that? Here's my foodie card.) The bold, peppery olive oil stood out, and the whole salad felt indulgent and cohesive.

We were lucky enough to get a Groupon for Biba, but it is always a pleasure to visit. And now, having tried her famous lasagna and "real" mozarella cheese, I feel almost as if I had been to Italy in an afternoon.

Wednesday, April 18, 2012

Potatoes, Favas and Garlic - Oh My!

Welcome to the experiment of my backyard garden, where I am growing a series of new plants just to see what will grow well where I live.

Exhibit #1: Potatoes gone wild!
See all of those containers? Every one of them contains potatoes! These have been growing since February and contain 3 varieties: Yukon Gold, Purple, and Fingerlings. After learning one year ago that potato plants will die once the temperature reaches 80 degrees, I have moved them into the shade in anticipation of this weekend's heat wave (high 80's for Sacramento). I hope by taking this precaution to extend their growing season and get some decent sized tubers this year... A lot of them!

Exhibit #2: Fava beans!
My Portuguese grandma gave me these seeds, and this is my first time growing them. I am surprised by how lovely the flowers are, and happy that favas will fix nitrogen in my soil so future plants growing in those spots can be happier.

Exhibit #3: Green Garlic! I planted elephant garlic last fall, and where I live, last fall's garlic is ready for harvest around summer or late summer. That's if you want the bulb kind you can store. Or, for the impatient or curious ones, you can pull up your garlic in spring before the bulbs form and enjoy green garlic. I couldn't resist this experiment this week, and here is what my green garlic looked like:
Close up on those just-starting-to-form bulbs. Cool!
As for the taste, green garlic is softer and milder than regular garlic. It's certainly worth trying!

Thursday, April 12, 2012

Mexican Tortilla Casserole


I made this Mexican Tortilla Casserole last night, thanks to my weekly recipe e-mail from The Splendid Table. It was easy to make, flexible, delicious, filling, good enough for company and simple enough for a Monday night supper. What made me love it even more was the fact that it was extremely economical and meatless to boot. When you find a recipe that has it all, it's only nice to share.


I didn't find the dish to be a typical casserole; it reminded me more of enchiladas, with the layers of tortilla, cheese, veggies, beans and tomato sauce. I made mine in a springform pan. I served wedges of this "Mexican Pie" ( a better name, I thought) with tomato salsa and sour cream, and the three males for whom I was cooking absolutely loved it. Their hearty appetites wiped away any hope of leftovers I may have had while preparing this dish, but I felt grateful that they enjoyed it so much, and complimented by the empty dish.

Mexican Tortilla CasseroleFrom The Mom 100 Cookbook: 100 Recipes Every Mom Needs in Her Back Pocket by Katie Workman; Serves 4 to 6

"Essentially a lasagna with tortillas standing in for noodles, this is one of those dishes that can miraculously be on the table in short order, made from things you most likely have in your pantry and fridge. If you don't like, or you don't have, one of the ingredients, skip it. Or, if you have something else that you think might be appealing all layered in (like slivered bell peppers to sauté with the onions, kale, chopped, cooked broccoli -- whatever the people in your home will eat), then fling it on in."

Nonstick cooking spray
1 tablespoon olive, vegetable, or canola oil
1 onion, chopped
1 teaspoon ground cumin
1-1/2 teaspoons chili powder
1 teaspoon minced garlic
1 can (14 ounces) chopped tomatoes, drained, with 1/3 cup juice reserved
1/4 cup tomato paste
2 cans (15.5 ounces each) white, black, or kidney beans (or a mixture of any two), rinsed and drained
Kosher or coarse salt and freshly ground black pepper
1 can (15 ounces) sweet corn kernels, drained, or 1-1/2 cups frozen corn, thawed
3 cups coarsely chopped spinach
4 medium-size (8-inch) flour tortillas
2 cups (8 ounces) shredded Monterey Jack or cheddar cheese
Chopped fresh cilantro (optional), for garnish
Sour cream (optional), for serving
Salsa (optional), for serving

1. Preheat the oven to 400F. Spray a 9-inch round cake pan, springform pan, or baking dish with nonstick cooking spray.

2. Heat the oil in a large skillet over medium heat. Add the onion, cumin, chili powder, and garlic and cook until you can smell the spices and the onion is softened, about 3 minutes. Stir in the tomatoes with the 1/3 cup of reserved juice and the tomato paste, then stir in the beans. Season with salt and pepper to taste. Let the bean mixture simmer until everything is hot, about 3 minutes. Add the corn and spinach and stir until the spinach has wilted and everything is well blended and hot, about 3 minutes. Taste for seasoning, adding more salt and/or pepper as necessary.

3. Place 1 tortilla in the prepared cake pan. Spread one fourth of the bean and vegetable mixture evenly over the tortilla, then sprinkle 1/2 cup of the shredded cheese evenly over the top. Repeat with 3 more layers, ending with the last quarter of the bean mixture and then the last 1/2 cup of shredded cheese.

4. Bake the tortilla casserole until it is hot throughout and the top is lightly browned, about 20 minutes. Let the casserole sit for about 5 minutes, then cut it into wedges using a sharp knife and serve it with a spatula or better yet a pie server. Sprinkle the top with cilantro, if desired, and serve with sour cream and/or salsa on the side, if you like.

Cooking Tip: You can make the tortilla casserole a day ahead of time, cover it with plastic wrap or aluminum foil, and put it in the fridge overnight; just take it out and let it sit at room temperature for about 20 minutes while the oven preheats to 400F. Bake the casserole uncovered. You can also reheat the cooked casserole at 350F for 15 to 20 minutes, until warm.

Wednesday, April 4, 2012

How To: Granola


A while back, I bought some gourmet granola for a friend. It looked wonderful: chia seeds, dried cherries, and sunflower seeds. Yogurt and granola make a fabulous breakfast, both delicious and healthy, but that store-bought granola set me back $8. Yeah... That's not an item I could afford to purchase on a regular basis. So I set about learning the basics of granola-making at home.

I started with a basic recipe from Sugar Sweet Bean, coming up with a bare bones template that could be altered for endless variation. I have enjoyed many variations on this granola theme in the past several months, and all have been lovely. (Except that one where I added the dried fruit before baking and they turned into burnt pieces of ash.)

And I have to say, it so, so easy. I will probably never buy granola again now that I know how simple it is to make at home. I basically just toss together whatever combination of nuts, seeds, dried fruit and spices I have in the pantry (bought cheaply in the bulk section of the grocery store). Bake it for 30 minutes and I have a new stash of wonderful homemade granola. Here's to a future of wholesome, exciting breakfasts!

Basic Granola Formula

3 c. old-fashioned oats
1 c. nuts (almonds, walnuts, pecans, pistachios, etc.)
1/2 c. mixed seeds (sesame seeds, sunflower seeds, pumpkin seeds, poppyseeds, flaxseeds, etc.)
3/4 c. coconut (optional)
2 tsp. ground cinnamon
1-2 pinches of coarse salt
5 T. liquid sweetener (pure maple syrup, honey, agave syrup, etc)
4 T. neutral oil (canola, olive oil, vegetable oil, etc.)

1 1/2 c. dried fruit of your choice (cranberries, blueberries, cherries, apricots, dates, etc.)

Combine all dry ingredients in a large bowl (do not add the dried fruit yet!). Stir in the sweetener and oil of your choice. If you want it sweeter, add more sweetener; feel it needs more oil, then add more. Line a bake sheet with aluminum foil, and spread the granola evenly. In a preheated 350 degree oven, bake for 15 minutes, then stir around, and bake another 12-15 minutes longer. Remove from oven and let cool for a bit before adding the dried cranberries. Cool completely and store in an airtight container.