Showing posts with label main dish. Show all posts

Wednesday, October 19, 2011

Pumpkin Lasagna


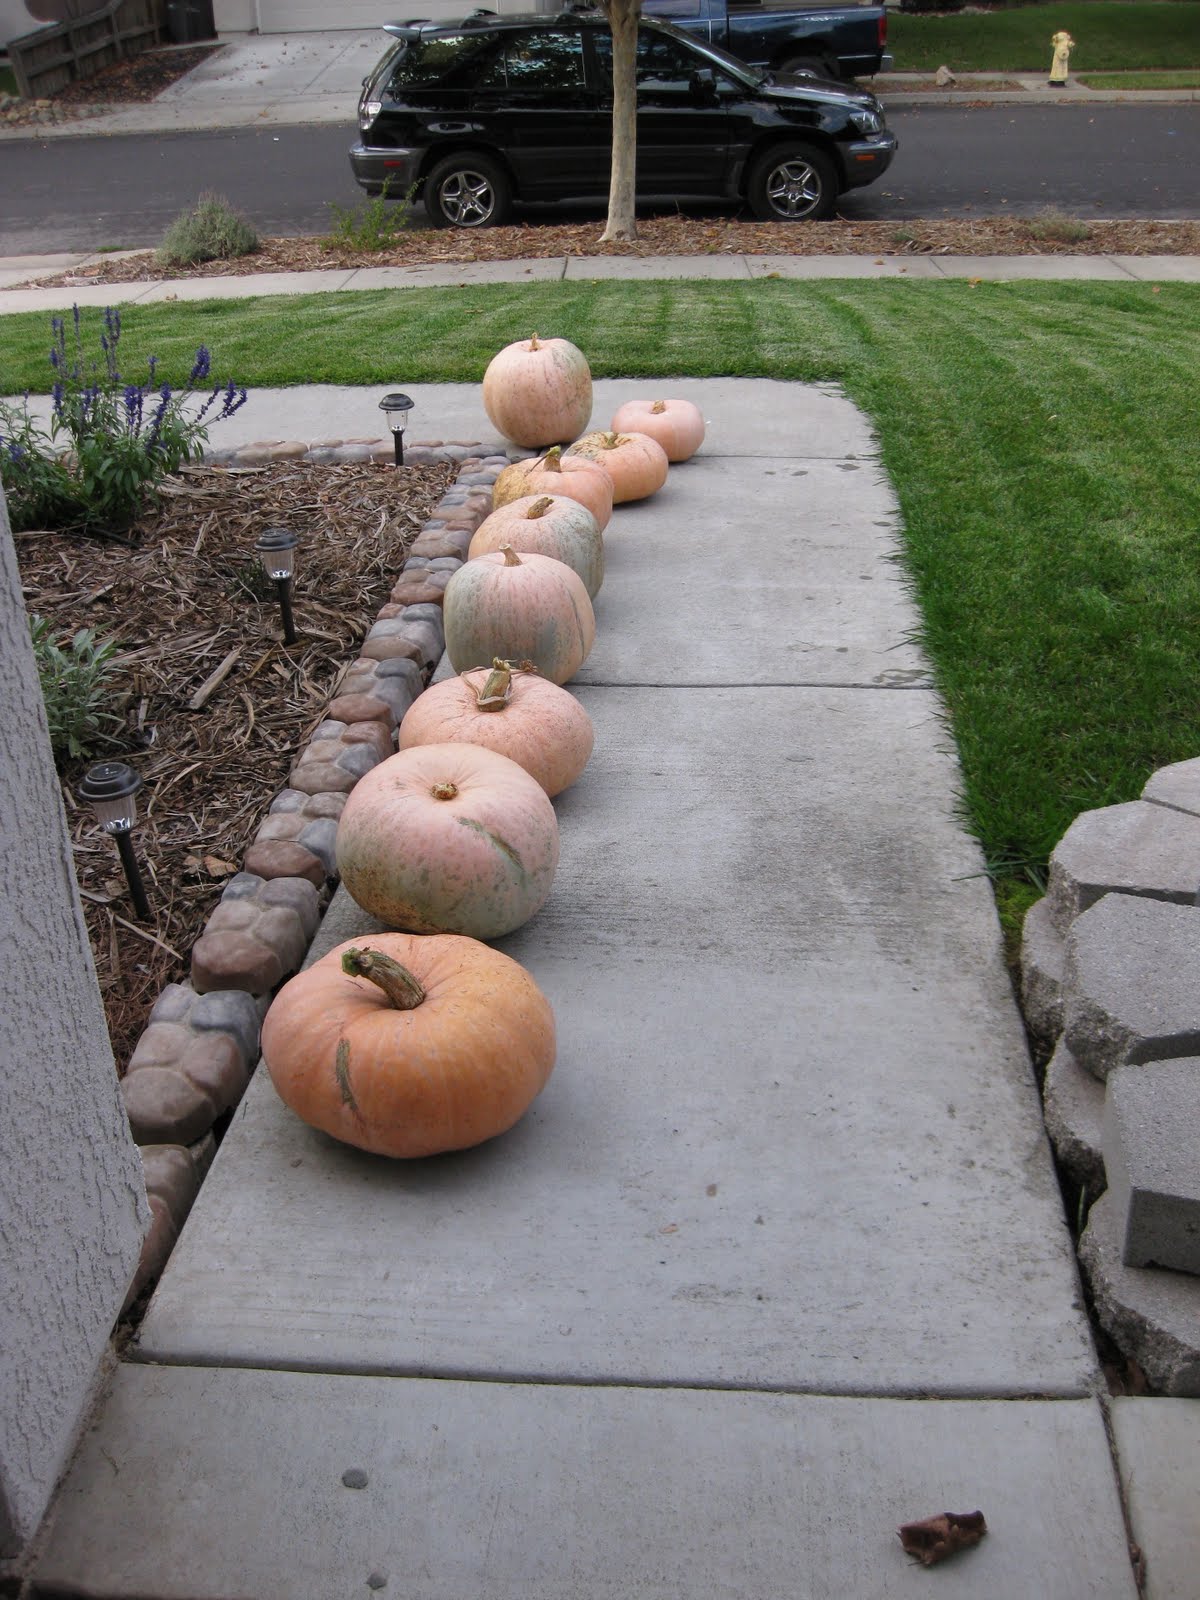
The garden yielded us a total of 13 pumpkins. I'm pretty sure the packet of seeds we planted said New England pie pumpkins, but these guys are way bigger than we expected them to be! We are going to have plenty of pumpkin for Thanksgiving next month and more than enough to share with friends.

Now I'm on the hunt for pumpkin recipes, especially those that take pumpkin beyond pie status to the dinner plate. I have read that any recipe calling for butternut squash can use pumpkin instead, so I have lots of room to experiment with that hypothesis. Here is my version of a recipe that I tried this week for Pumpkin Lasagna.

I was a little trepidatious when I first envisions a pumpkin lasagna, thinking of cutting into a square and finding a thick layer of pumpkin filling, but it wasn't how I imagined it - it was much prettier and tastier. The pumpkin puree is blended with soft ricotta and other cheeses for a creamy golden layer that sits besides your traditional layers of pasta sauce, noodles, meat and vegetables. I love the versatility of lasagna as a season dish that you can throw zucchini and eggplant into in summer, then pumpkin in the fall. This is definitely a recipe I would make again.

Pumpkin Lasagna

1 medium onion, chopped
4 to 6 garlic chopped
1 tablespoon olive oil
1 pound lean ground beef or Italian sausage, casings removed
4 handfuls baby spinach
2 jars of prepared pasta sauce
Kosher salt, freshly ground black pepper and spices, to taste
1 pound low-fat ricotta cheese
1 cup shredded mozzarella cheese + extra for topping
1 cup shredded parmesan cheese
2 eggs
1 1/2 cups pumpkin puree
1 pound no-boil lasagna noodles

In a large heavy skillet, over medium heat, saute onion and garlic in the olive oil until translucent. Add meat and cook until brown, breaking it up with a wooden spoon as it cooks. Add spinach and cook for 5 more minutes. Set aside.

In a large bowl mixing together the ricotta, mozzarella and parmesan cheeses. Add eggs, pumpkin puree and salt and pepper, to taste. Mix very well.

Preheat oven to 350 degrees F.

Build your lasagna in a large (9 by 12-inch) starting with a layer of sauce, a layer of pasta, a layer of half the sausage and a layer of half the filling. Add another layer of pasta, sauce, the remaining sausage and the filling. Finish with a layer of pasta and a layer of sauce. Sprinkle some mozzarella cheese on top and bake for 25 minutes. Let cool for 15 minutes before serving.

Sunday, October 9, 2011

Pan-Fried Butternut Squash, Fried Sage and Pine Nuts

There's a slight chill in the morning air. Autumn has finally arrived in Northern California, bringing high temperatures of 70's to 80's. Suddenly I find myself craving kale and butternut squash, soups and stews.

I bought a butternut squash at a farmer's market this week, because it simply seemed like the thing to do. As I contemplated the possibilities, I decided I wanted something heartier than butternut squash soup, although I also have a good recipe for that classic autumn dish as well.
I thought of one of my favorite dishes at a certain Italian restaurant, a tender ravioli filled with butternut squash in a creamy sauce with fried sage.

Not being ambitious enough to hand roll my own pasta, I settled upon a recipe that used farfalle but the same classic flavors of squash and sage, along with pine nuts for a crunch. We used sage from our yard, which is happily thriving now that it can sink its roots into actual earth, and two small Walla Walla onions still hanging in there from the garden.

The final product was addictive - sweet, salty, herbaceous, it had all of my favorite elements from the more complicated ravioli dish, but with a fraction of the effort. I declare it the perfect hearty supper for a cool fall night.

Pasta Pan-Fried with Butternut Squash, Fried Sage, and Pine Nuts

From The Kitchn

1 medium butternut squash
1 small sweet onion, peeled and diced
3 cloves garlic, minced
Olive oil
Salt and pepper
1/2 cup fresh sage leaves
1 pound farfalle pasta
3/4 cup pine nuts, toasted
4 ounces high quality Parmesan, shredded or shaved (about a cup total)

Heat the oven to 375°. Cut the butternut squash in half and scoop out the strings and seeds the middle cavity. Flip the squash halves upside down and peel them. (Note: The raw squash rind can irritate your hands. If they start to itch or tingle, wear gloves.) Cut the squash into 1-inch cubes. Toss with the onion, garlic, a drizzle of olive oil and salt and pepper. Mince about half of the fresh sage leaves and also toss with the squash.

Spread the squash mixture in a thin layer on a large baking sheet and roast for about 40 minutes or until the squash is soft.

Heat salted pasta water to boiling and cook the farfalle until al dente. Drain and set aside. As the squash finishes roasting, heat about two tablespoons of olive oil in a large high-sided sauté pan. The oil is ready when it pops and sputters. (Don't let it start smoking.) Drop in the rest of the sage leaves and fry for about a minute, or until they begin to just shrivel up.

Remove with a slotted spoon and salt lightly. Crush with the back of a spoon. Add half the pasta to the pan, along with half the roasted squash mixture. Crumble in half the sage. Cook, stirring frequently, for five minutes or until the pasta is heated through and getting crispy on some of the edges. Add the pine nuts and cook for another minute. Stir in half the cheese and serve. Serves 4 generously.

(Repeat the last step with the rest of the ingredients. We split it into two because none of our pans are big enough to accommodate the entire recipe. It's very important that you not crowd the pan too much - you want the pasta to really pan-fry, not just steam up.)

Tuesday, March 29, 2011

Light Salmon Burgers

We are always looking for tasty new fish recipes. Salmon burgers seemed retro to me at first, but this recipe from Eating Well magazine really revamped the idea. Gone is the canned salmon and the fishiness (much to my husband’s relief). Now it’s all about starting with wild-caught salmon fillets and processing them as little as possible. I have to admit, when I looked at the “patties” I thought something had gone wrong. “It’s just chunks of salmon! These are totally gonna fall apart!” I fretted. But miraculously, they stayed together pretty well, and came out simply delicious. We cooked them in garlic-infused olive oil and loved the results. Buns are optional, and the burgers would be wonderful paired with either the suggested green goddess dressing or ketchup. Without the bun and served with a dollop of the sauce, they are under 300 calories and a lovely light dinner.
Salmon Burgers

From Eating Well magazine

1 pound wild salmon fillet, skinned

2 tablespoons finely chopped red onion, or scallion

2 tablespoons chopped fresh cilantro

1/2 teaspoon finely chopped peeled fresh ginger

1/4 teaspoon kosher or sea salt

1/8 teaspoon freshly ground pepper

1 tablespoon extra-virgin olive oil, or canola oil

Optional: Green goddress dressing to serve Preparation: 1.With a large chef’s knife, chop salmon using quick, even, straight-up-and-down motions (do not rock the knife through the fish or it will turn mushy) until you have a mass of roughly 1/4-inch pieces. Transfer to large bowl and gently stir in onion (or scallion), cilantro, ginger, salt and pepper, being careful not to overmix. Divide the mixture into 4 patties, about 1 inch thick. Chill in the refrigerator for at least 20 minutes (or up to 2 hours) before cooking. 2.Heat oil in a large nonstick skillet over medium heat. Add the burgers and cook until browned on both sides and just cooked through, 4 to 6 minutes total. Serve with 1 tablespoon Green Goddess Sauce each. Serves 4.

Wednesday, March 16, 2011

Tamarind Pork with Pineapple Chutney

Photo courtesy of Cooking Light

This dish was so good. As I sat down to eat it, I was licking my lips and showering my husband with praise. (I left the recipe out on the counter and he had the pork ready and waiting for me when I got home from work. I was ecstatic!) It may seem like a random recipe to try, but ever since last week when I bought some tamarind paste (hoping to add an authentic touch to some shrimp pad thai), I have been wondering what to do with the rest of the jar.

Tamarind is a sour-sweet flavor common to some Asian and South American cuisines. I loved it in this recipe, in which the pork comes out tender, moist and absolutely packed with flavor. Sour and sweet, tangy and a little spicy, this dinner was full of juxtapositions and we couldn't get enough.

P.S. We were fresh out of rum (Why is the rum always gone?) and my husband confided that he substituted some vanilla extract and water for it.

Tamarind Pork with Pineapple Chutney

Chutney:
1 1/2 teaspoons butter
1 cup chopped onion
1 tablespoon grated peeled fresh ginger
1 serrano chile, seeded and minced
3 cups chopped pineapple
1/4 cup light brown sugar
2 tablespoons gold rum
1/4 teaspoon salt
1/4 cup chopped fresh cilantro
1/8 teaspoon ground red pepper

Pork:
1 tablespoon sweet chili sauce
1 tablespoon lower-sodium soy sauce
1 teaspoon rice vinegar
2 teaspoons tamarind paste
2 (1-pound) pork tenderloins
3/4 teaspoon salt
3/4 teaspoon freshly ground black pepper
1 tablespoon canola oil

1. To prepare chutney, melt butter in a small saucepan over medium heat. Add onion, ginger, and chile to pan; cover and cook 6 minutes or until onion is tender. Uncover. Stir in pineapple and next 3 ingredients (through 1/4 teaspoon salt); bring to a boil. Reduce heat, and simmer, uncovered, 20 minutes or until pineapple is tender, stirring occasionally. Cool 20 minutes; stir in cilantro and red pepper.

2. Preheat oven to 400°.
3. To prepare pork, combine chili sauce and next 3 ingredients (through tamarind), stirring to combine. Reserve half of soy mixture. Heat a cast-iron grill pan over medium-high heat. Sprinkle pork with 3/4 teaspoon salt and black pepper; coat pork with oil. Add pork to pan; sauté 4 minutes on 1 side or until browned. Brush pork with half of soy mixture; turn pork over. Place pan in oven; bake at 400° for 16 minutes or until a thermometer inserted in the thickest portion of pork registers 155° (slightly pink). Remove pork from pan; let stand 10 minutes. Brush pork evenly with reserved soy mixture. Slice pork crosswise into 1/2-inch-thick medallions. Serve with chutney.

Tuesday, March 8, 2011

Panko Fish Nuggets With Potato Wedges

Can this diet bomb be lighted up and remain delicious?

The answer is yes!

Ah, Family Circle, that upbeat staple of waiting rooms, that perpetual presence on mom’s coffee table. I was flipping through this month's copy (our waiting room at the law office where I work is no exception to the rule) and saw there was a nutrition section focusing on fish. According to the article, the American Heart Association recommends eating fish at least twice a week. I think that’s pretty doable - a tuna sandwich for lunch one day and fish for dinner once a week and you’re there!

The magazine offered a few family-friendly recipes featuring fish, including one I like to think of as an updated, healthier version of the traditional fish’n’chips. Instead of deep-frying the fish and potatoes, you coat the fish pieces with crunchy panko and bake them alongside potato wedges. Kids would probably enjoy these "fish nuggets" because they resemble chicken nuggets, which have all but become its own food group for American children everywhere .

Note: I substituted tilapia for the cod because it’s one of the most sustainable choices at the fish market. It came out great!


Light Fish N Chips
(or Panko Fish Nuggets with Potato Wedges)
Adapted from Family Circle


2 large baking potatoes, scrubbed and each cut into 8 wedges
2 eggs
1 T. Dijon mustard
1/2 c. flour
1 1/2 c. panko bread crumbs (preferably whole wheat)
1 1/2 lbs cod, tilapia, or other firm white fish, cut into chunks

Heat oven to 450F. Line a baking sheet with aluminum foil and coat with cooking spray. Set aside.

Place potatoes on another foil-lined baking sheet. Spray with olive oil and season with sea salt and ground pepper. Bake at 450F for 30 minutes or until tender, turning after 20 minutes.

Meanwhile, place flour in a shallow glass dish. In a bowl, whisk together eggs and mustard. Place panko on a separate plate. Coat fish pieces with flour, dip in egg mixture and coat with pank. Place fish pieces and prepared baking sheet. Add pan to oven after potatoes have baked for 15 minutes. Bake fish for 15 minutes.

Serve fish with potato wedges and condiment of your choice. (We aren’t fans of mayo-based dipping sauces like tartar sauce, but we do like ketchup, honey mustard or Thai chili sauce.)

Monday, March 7, 2011

Basic Shrimp Pad Thai

Courtesy of Cooking Light

Cooking Light magazine did a feature this month where they lightened up classic take out dishes. Chicken fried rice, supreme pizza, and my beloved pad thai were all featured. I've not been impressed with packaged versions of pad thai, so I thought I would give the recipe a go. As it turned out, although quite simple, this recipe impressed me with its spicy goodness (yes, if you go with the chili garlic sauce option, it's got some heat). The resulting dish wasn't quite identical to take out, but pretty close, and its much less oily- a good difference! We will be making it again!

Shrimp Pad Thai

8 ounces uncooked flat rice noodles (pad Thai noodles)
2 tablespoons dark brown sugar or tamarind paste
2 tablespoons lower-sodium soy sauce
1 1/2 tablespoons fish sauce
1 1/2 tablespoons fresh lime juice
1 tablespoon Sriracha or chili garlic sauce
3 tablespoons canola oil
1 cup (2-inch) green onion pieces
8 ounces peeled and deveined large shrimp
5 garlic cloves, minced
1 cup fresh bean sprouts
1/4 cup chopped unsalted dry-roasted peanuts
3 tablespoons thinly sliced fresh basil

1. Cook noodles according to package directions; drain.

2. While water comes to a boil, combine sugar and next 4 ingredients (through Sriracha) in a small bowl.

3. Heat a large skillet or wok over medium-high heat. Add oil to pan; swirl to coat. Add onion pieces, shrimp, and garlic; stir-fry 2 minutes or until shrimp is almost done. Add cooked noodles; toss to combine. Stir in sauce; cook 1 minute, stirring constantly to combine. Arrange about 1 cup noodle mixture on each of 4 plates; top each serving with 1/4 cup bean sprouts, 1 tablespoon peanuts, and 2 teaspoons basil.

Wednesday, October 6, 2010

Goat Cheese Pizza with Arugula

I love pizza. I am thrilled that pizza comes in all varieties these days. I made this version last week when my friend Allison was visiting and it was a huge hit. It features goat cheese in place of the more traditional mozzarella. Because products made from goat's milk are easier digested by the lactose intolerant, I can enjoy this pizza with no regrets. Unless I have more than two slices and can't fit into my pants. I might regret that.

You can start with store-bought pizza crust, or use this recipe which boasts a gorgeous flavor and wonderful texture. Smooth some pesto sauce over your dough, layer with thin slices of ripe tomato and coins of herbed goat cheese, then sprinkle with fresh garlic. When it comes out of the oven, a handful of peppery arugula greens adds the finishing touch. It's a beautiful thing! Don't be afraid to try something new - this one won't disappoint you.

Goat Cheese Pizza and Arugula

1 unbaked pizza crust
6 tablespoons prepared pesto sauce
3 Roma tomatoes, thinly sliced
1 (8 ounce) package seasoned goat cheese
2 cloves garlic, peeled and thinly sliced
1 cup fresh arugula
1 teaspoon olive oil (optional)

Directions

1. Preheat oven according to pizza package instructions. (If using homemade, crank it up to 500F to get as close to an authentic oven as you can in a home oven.)
2. Dab pesto onto the center of the pizza base, and spread toward the outer edges. Cut the goat cheese into thin coins, and spread or crumble across the pizza. Arrange tomato slices over goat cheese. Sprinkle with garlic. Brush the crust edges lightly with olive oil if desired.
3. Place pizza directly on preheated oven rack. Bake for 10 to 12 minutes, or until the crust edges are golden.
4. After taking pizza out of the oven, allow to cool for a few minutes so that the cheese has time to set. After a couple of minutes, cover the pizza with a few handfuls of arugula. Cut, serve, and enjoy!

Saturday, September 25, 2010

Spanish Tortilla

After making Portuguese green soup this week, we had leftover linguica, and I decided to make a Spanish tortilla, using Portuguese sausage in place of the Spanish chorizo.

When I announced my intention of making a Spanish tortilla, my husband became excited. "You won't like it," I responded. "Of course I'll like it!" he insisted. "You won't mind the eggs and the potatoes?" I queried (he despises both foods). Puzzled, he said, "Huh?"

Obviously, my husband had the Mexican tortilla confused with a Spanish one, which is more like a fantastic omelette, layered with potatoes and onions. I found a recipe online and tweaked it a bit. I used a cast-iron skillet, which works wonderfully for browning the tortilla and the meat, and can easily be used on both the stove top and oven.

Linguica made a wonderful substitution for the chorizo. I stuck with fresh parsley for the herbs and accidentally substituted fennel for the leek, but it still tasted amazing. Here are the basic stages of the process, followed by the recipe.


Once all of the ingredients have been combined, the tortilla will cook in the skillet,
first on the stove, then in the oven to brown the top.


Finally, you turn it out onto a plate...


Slice it up (here's the cross-section view)...


And serve it up. It will be gorgeous, brown and crusty on the top,
with delicate layers of egg, potato, sausage, onion and leek underneath.

Spanish Tortilla

Few dashes red pepper flakes
Small handful of chopped herbs (parsley, chives or chervil, or combination)
Olive oil
1/2 Spanish onion, thinly sliced
1/4 lb. potato, VERY thinly sliced
1/2 leek (white part), washed well and finely sliced
1 garlic clove, finely chopped
Kosher salt and ground pepper to taste
1/4 lb. dried chorizo or linguica, sliced and quartered
6 free-range eggs

Preheat the oven to 450F. Place the red pepper flakes and herbs in a large bowl. Meanwhile, heat a cast-iron or saute pan over medium low heat and saute the onions until soft. Add the potatoes and leeks to the pan and when soft, add the garlic and cook another 2-3 minutes. Place ingredients in the bowl with the red pepper flakes and herbs. Wipe out the saute pan with paper towels and return to the heat. Saute the sausage for about 5 minutes or until crisp, then add to the bowl of ingredients.

In a small bowl, beat the eggs with a fork and season with a little salt and pepper. Add eggs to large bowl with other ingredients. Heat a little more olive oil in the pan and swirl to coat. Add all of the ingredients to the pan. Cook on one side until the eggs are set (the top will be runny still). Then, place pan in oven until the tortilla is light brown and firm to the touch (check after 5 minutes). Leave to set for 5 minutes, then turn onto a serving platter.

Tuesday, September 21, 2010

Mahimahi with Bacon-Tomato Butter

Photo Courtesy of Cooking Light

We are still chipping away at the enormous pile of fish that the male members of my family caught in Mexico this summer. My favorite by far is the dorado, which I just last week discovered is more commonly known as mahi-mahi or dolphinfish.

My husband made this for dinner for me and it was good stuff. Brining white fish seems to be the hip method of choice these days, as it removes the "fishy" flavor. It can be used with any similar type of fish recipe. As for the sauce, quality bacon adds a savory umami base flavor to the tomato/butter mixture. We didn't have hot smoked paprika, so we substituted regular paprika and it worked well. Happy Omega-3 eating!

Mahimahi with Bacon-Tomato Butter

2 cups water
1 tablespoon fine sea salt
2 teaspoons sugar
4 (6-ounce) mahimahi fillets
Cooking spray
1/4 teaspoon table salt, divided
1 slice center-cut bacon, finely chopped
1 garlic clove, thinly sliced
1/4 teaspoon hot smoked paprika
2 plum tomatoes, seeded and diced
2 tablespoons butter
1. Combine first 3 ingredients in a shallow dish, stirring until sea salt and sugar dissolve; add fish. Let stand 20 minutes. Drain; pat dry.
2. Prepare charcoal fire in a chimney starter; let coals burn for 15 to 20 minutes or until flames die down. Carefully pour hot coals out of starter, and pile them onto one side of the grill. Coat grill grate with cooking spray; put grate in place over coals.
3. Sprinkle 1/8 teaspoon table salt evenly over fish. Lightly coat fish with cooking spray. Place fish, skin side down, over direct heat on grill rack coated with cooking spray; grill 2 minutes or until well marked. Turn fish over and move to indirect heat; grill 12 minutes or until desired degree of doneness.
4. Heat a small skillet over medium heat; add bacon to pan. Cook 5 minutes or until bacon is almost crisp, stirring occasionally. Add garlic; cook for 2 minutes, stirring frequently. Add paprika, and cook for 20 seconds, stirring constantly. Add tomatoes, and cook for 3 minutes. Stir in butter. Remove from heat; stir in remaining 1/8 teaspoon table salt. Place 1 fillet on each of 4 plates; top each serving with about 2 tablespoons tomato mixture.

Wednesday, August 25, 2010

Vegetable Chickpea Curry

Photo courtesy of Cooking Light

It is a truth universally acknowledged that a slow cooker is a working (wo)man’s best friend. However, many slow cooker recipes yield a boring chunk of meat that has been cooked in its own fat for several hours. Or maybe small chunks of cooked meat. In a sauce. There's nothing wrong with comfort food. Yet sometimes you want more than a hunk of meat for dinner, especially if you (like me) observe Meatless Monday or are attempting to lower your overall consumption of meat.

So off I went, scouring the Internet for a good meatless slow cooker recipe. Cooking Light came through for me once again, and I found this amazing recipe. The texture of the vegetables comes out perfectly done, not mushy at all, and the flavors are vibrant. Serve with brown basmati rice and a squeeze of lemon, and you’ve got yourself a tasty meatless dinner, packed with protein, fiber and of course, excellent flavor.
Vegetable Chickpea Curry

Yield: 6 servings (serving size: 1 1/3 cups vegetable mixture and 1 lemon wedge)

Ingredients

1 tablespoon olive oil

1 1/2 cups chopped onion

1 cup (1/4-inch-thick) slices carrot

1 tablespoon curry powder

1 teaspoon brown sugar

1 teaspoon grated peeled fresh ginger

2 garlic cloves, minced

1 serrano chile, seeded and minced

3 cups cooked chickpeas (garbanzo beans)

1 1/2 cups cubed peeled baking potato

1 cup diced green bell pepper

1 cup (1-inch) cut green beans

1/2 teaspoon salt

1/4 teaspoon black pepper

1/8 teaspoon ground red pepper

1 (14.5-ounce) can diced tomatoes, undrained

1 (14-ounce) can vegetable broth

3 cups fresh baby spinach

1 cup light coconut milk

6 lemon wedges

Preparation

Heat oil in a large nonstick skillet over medium heat. Add onion and carrot; cover and cook 5 minutes or until tender. Add curry powder, sugar, ginger, garlic, and chile; cook 1 minute, stirring constantly.

Place onion mixture in a 5-quart electric slow cooker. Stir in chickpeas and next 8 ingredients (through broth). Cover and cook on HIGH 6 hours or until vegetables are tender. Add spinach and coconut milk; stir until spinach wilts. Serve with lemon wedges.

Wednesday, August 18, 2010

Fruity Fish Tacos


I still remember the first time my mom got a copy of Taste of Home magazine in the mail. At age 12, my main source of cooking advice was my mom's weathered, checkered copy of the Better Homes and Gardens cookbook. I had made pretty good headway through that staple and was hungry for more.

I poured through the pages of this new magazine publication, taking in the comforting photos and enticing recipes. I recall one of the main themes was cherries, served all different kinds of ways. I had never seen a food magazine before, and the idea of a monthly source of new material for my culinary experimentation thrilled me.

Nowadays, I lean more towards the fresh, the whole foods, and varied ethnic influences. Often my impulse is to shy away from the heavier, convenience-oriented, processed recipes that tend to compose the pages of Taste of Home. Still, I still enjoy getting my copy each month since my mom got me a subscription for Christmas. Every now and then I find something worth investigating, and this one was killer: a light, fruity fish taco. It was a fantastic use for the dorado my husband caught on a recent fishing trip down in Baja California. Gone are the deep-fried nuggets, the cabbage slaw traditionally found in fish taco recipes. We made this version when we had company for dinner and everyone adored them.

Fruity Fish Tacos
Adapted from Taste of Home

INGREDIENTS:

1 medium mango, peeled and cubed
1/2 cup cubed avocado
1/4 cup chopped red onion
2 tbsp chopped and seeded jalapeno pepper
1 tbsp minced fresh cilantro
3 tsp olive oil, divided
1 tsp lemon juice

1 lb halibut steaks, 3/4" thick (or other firm white fish)
1/2 tsp salt
1/4 tsp pepper
Shredded Bib lettuce
4 flour tortillas, 6", warmed
4 tsp sweet Thai chili sauce

COOKING DIRECTIONS:
In a small bowl, combine the mango, avocado, onion, jalapeno, cilantro, 2 tsp oil, and lemon juice; set aside. Brush halibut with remaining oil and sprinkle with salt and pepper.

Coat grill rack with cooking spray before starting the grill. Grill halibut covered, over high heat or broil 3-4" from the heat for 3-5 minutes on each side or until fish flakes easily with a fork.

Place lettuce leaves on tortillas. Top with fish and mango mixture. Drizzle with chili sauce.

Thursday, August 12, 2010

Light Chicken Enchiladas

We lighten up a diet bomb- enchiladas!

Last night, our mission was to make light enchiladas. This dish is generally a diet bomb, consisting of large pellets filled with red meat and cheese floating in an ocean of salty sauce. Or, if you’re like my mom and favor the white chicken version, the sauce consists mostly of sour cream and processed Campbell’s soup!

Our version started with home-style white corn tortillas from a nearby market, which we filled with shredded chicken breast, black beans, and sauteed bell peppers. We made our own sauce from scratch to cut down the salt, and sprinkled our filled tortillas with just a handful of shredded cheese. After 25 minutes in the oven at 375, our light enchiladas were ready, and very good. Our Mexican craving was satiated without bulging our bellies.

Here is the recipe I used for homemade enchilada sauce, which can be ready in 10 minutes. If you want it mild, I suggest using mild chilies.


Homemade Enchilada Sauce
2 (8 ounce) cans tomato sauce
1 (4 ounce) can chopped green chilies, undrained
1/2 cup onion, chopped
2 teaspoons chili powder
1 teaspoon ground cumin
1/4 teaspoon dried oregano
1 clove garlic, minced

Combine all tomato sauce ingredients and place in a blender. Puree ingredients. Then place in a saucepan. Heat over medium heat until heated through, about 5 minutes. Use as desired for enchiladas.

Tuesday, August 10, 2010

Healthy Stuffed Zucchini

A not very good picture of Stuffed Zucchini. Blame Food Network for this one.

Continuing my "light fare" theme for the week, my sister-in-law Chelsea recently introduced me to a light version of stuffed zucchini. This recipe comes from Ellie Krieger, the host of "Healthy Appetite" on Food Network, and it is amazing!

Instead of the typical heavy meat and cheese filling, Ellie bulks up a little meat with cooked bulgur (you'll never know it's in there), and adds tons of Mediterranean flavor with spices, currents and pine nuts. I loved this recipe! You can use the filling in any summer squash, bell peppers, or even eggplant. We weren't sure what this would taste like, but even my husband, sworn enemy of raisins, commented that the currents add a nice sweet note to the filling.

Note: To cook bulgur, simply mix one part bulgur with two parts boiling water, cover and let sit for about 10 minutes.


Stuffed Zucchini

6 medium zucchini

1 tablespoon olive oil

1 small chopped onion (about 1 cup)

1 tablespoon chopped garlic

1/2 pound lean ground beef (at least 90 percent lean)

2 teaspoons ground cumin

1 teaspoon ground coriander

1/4 teaspoon red pepper flakes

1 (14.5 ounce) can no-salt-added diced tomatoes, strained and juice reserved (about 3/4 to 1 cup juice)

1 cup cooked bulgur (1/3 cup uncooked)

3 tablespoons dried currants

3 tablespoons pine nuts, toasted in a dry skillet over a medium-high flame for 2 minutes

1/4 cup chopped parsley leaves

1/2 cup low-sodium tomato sauce

1/2 teaspoon salt


1. Preheat oven to 375 degrees F.

2. Cut each zucchini in half crosswise. Using a melon baller, carefully scoop out zucchini flesh, leaving about 1/4 inch flesh intact on all sides and leaving zucchini closed at the bottom of each half. Reserve zucchini flesh for another use, or discard. Reserve zucchini tubes.

3. Heat oil in a heavy skillet over medium-high heat. Add onion sand cook, stirring, until they are soft and translucent, about 3 minutes. Add garlic and cook for 2 minutes more. Add ground beef, cumin, coriander and red pepper flakes and cook until meat is just done and no longer pink, 4 to 5 minutes. Add bulgur, and diced tomatoes and currants and cook an additional 2 to 3 minutes. Remove from heat and stir in pine nuts and parsley. Let mixture cool slightly, about 5 minutes. Using a small spoon or clean hands, gently stuff zucchini halves with beef-mixture.

4. Place zucchini halves in a 9 by 13-inch glass baking dish. Combine reserved tomato juice, tomato sauce and salt and pour over zucchini. Cover tightly with foil and place in oven. Bake for 20 minutes. Remove from oven, uncover and rotate zucchini. Re-cover, return dish to oven and bake an additional 20 to 25 minutes, until zucchini is cooked through but still slightly firm. Place 2 zucchini halves on a plate and serve with tomato sauce.

Tuesday, May 25, 2010

My Favorite Black Bean Soup (so far....)

We are always thrilled to find tasty meatless dishes, and this soup was a huge hit for us. Not only is it quick to prepare (ready in under 30 minutes) and delicious (great combination of spices), but the colors are just gorgeous. Black, yellow, green, red juxtaposed together make this dish beautiful and healthy as well. What more can you ask for? Besides a side of corn bread...

My Favorite Black Bean Soup

Ingredients:
1 Tbsp. olive oil
1 onion, chopped
3 cloves garlic, minced
2 (15 oz.) cans black beans, rinsed and drained (or substitute cooked dried beans- we did)
2 cups frozen corn, thawed
½ green bell pepper, chopped
½ red bell pepper, chopped
14 oz. can low sodium chicken broth
14 oz. can diced tomatoes, undrained
1 bay leaf
1/2 tsp. dried thyme leaves
1 tsp. dried basil leaves
1/2 tsp. cumin
1/8 tsp. pepper
dash red pepper flakes

Preparation:

Cook onion and garlic in oil in a large soup pot until tender. Mash about half of the beans using a fork, and add to the pot, along with the remaining whole beans, corn, bell pepper, chicken broth, and tomatoes.

Stir in seasonings. Cover pot and bring to a boil. Reduce heat to low and simmer the soup for 8-10 minutes, stirring frequently. Remove bay leaf and serve. Serves 4-6

Wednesday, February 17, 2010

What I Do With Dolphin-Free Tuna

My Grandpa Rocha (mom's dad) has in his life been a cattle farmer, ice cream delivery man, and now, a retired fisherman. By that, I mean that he now spends whole summers in Oregon fishing, and his frozen and home-canned fish is a hot commodity amongst family members, particularly his tuna. The reason for this is that it is the only tuna we can be 100% certain doesn't contain any baby dolphin parts mixed in with the fish.

Recently, my mom bequeathed to me one such coveted jar of tuna. Would I relegate this fish to an ordinary tuna sandwich? Nay, heaven forbid! I decided to make it into a delicious, tantalizing casserole.

I found a recipe on allrecipes.com but it left a lot to be desired, both in nutrition and taste, according to come of the comments. First, I substituted whole grain pasta for the refined stuff. I cut out a lot of the butter, and added lots of spices and herbs for flavor (since some of the comments implied that it was on the bland side).

The result was pure Omega-3 nirvana. This is comfort food extraordinaire, and even if you substitute Bumblebee, you will be glad you made it. The homemade white sauce kicks the pants off anything from a box or can that you have ever tried.


Tuna Noodle Casserole From Scratch


1 T. olive oil
1 (8 oz) package uncooked medium egg noodles (preferably whole grain)
1/2 medium onion, finely chopped
1 stalk celery, finely chopped
2 cloves garlic, minced
1/4 c. parsley, chopped
8 oz. button mushrooms, sliced
4 T. butter
1/4 c. flour
2 c. milk
lemon, nutmeg, cayenne pepper, salt and pepper
2 (6 oz) cans tuna, drained and flaked
1 c. thawed frozen peas
1/4 c. bread crumbs
1/4 tsp. garlic powder
1 T. butter, melted

Preheat oven to 375 degrees F (190 degrees C). Spray a medium baking dish with cooking spray.

Bring a large pot of water to a boil. Add egg noodles, cook for 8 to 10 minutes, until al dente, and drain.

Pour olive oil in a skillet over medium-low heat. Stir in the onion, celery, parsley and garlic, and cook 5 minutes, until tender. Increase heat to medium-high, and mix in mushrooms. Continue to cook and stir 5 minutes, or until most of the liquid has evaporated.

Melt 4 tablespoons butter in a medium saucepan, and whisk in flour until smooth. Gradually whisk in milk, and continue cooking 5 minutes, until sauce is smooth and slightly thickened. Add a squeeze of fresh lemon and season with spices listed. Stir in tuna, peas, mushroom mixture, and cooked noodles. Transfer to the baking dish.

Melt remaining tablespoon of butter in a small bowl, mix with bread crumbs and garlic powder, and sprinkle on top of the casserole.
Bake 25 minutes in the preheated oven, or until bubbly and lightly browned.

Monday, January 25, 2010

Meatloaf - It's what's for Dinner!

My aunt bought me the following Christmas present:


Norpro 2 Piece Nonstick Meatloaf Bread Pan Set

See larger image


Norpro 2 Piece Nonstick Meatloaf Bread Pan Set


You can use the outer pan for baking bread and pound cake. But the double design is especially good for making meatloaf, as the unique design allows the fat with its calories and cholesterol to drain into the bottom pan.

I don't know if my aunt was aware that I have a special place in my heart for meatloaf (hello, comfort food!), but tonight I used this pan to make my own special meatloaf. I knew I would have my work cut out for me, seeing as my husband reminded me that he does not normally care for this dish.

So I came up with the following recipe:


Delicious Meatloaf


Mix together in a bowl until smooth:
1 tsp. Worcestershire sauce
1 egg
1 piece of wheat bread, blended into crumbs (pop it in the blender until it's smooth)
Sprinkle of dried onions
Garlic salt and freshly ground pepper, to salt

Mix in:
1 lb. lean beef

Then shape mixture into loaf plan and top with sauce, a mixture of:
1/3 c. ketchup
2 T. brown sugar
Squeeze of lemon juice, yellow mustard, and honey.

Bake in 350F oven for 45 minutes. Allow to sit for 10 minutes, then slice and serve. Serves 4.

Result: After a few bites, my husband admitted, "I actually like this meatloaf." That's the best compliment a cook can hope for!

Tuesday, January 5, 2010

Me and the Naked Chef in the Kitchen


I received “The Naked Chef Takes Off” as a birthday present as a teenager. I was a huge fan of Jamie Oliver’s hip cooking show and loved looking at the pictures and reading this cookbook, which is chock full of British slang and Jamie’s quirky personality. Yet I never tried any recipes... Until last night, when I made an attempt at his “fantastic roast chicken”!

A whole chicken is a wonderfully economic thing to make for dinner, particularly for a young couple. Besides a delicious dinner, you’ve got leftovers for the next day’s lunch (great for sandwiches or salads), as well as a carcass and tidbits to freeze and use to make stock and/or soup at a later time. I made many (healthier and/or more desirable, in my opinion) adjustments to Jamie’s recipe, and was thrilled when it came out “absolutely fantastic”, as he would say. You simply must try parsnips with the vegetables - they were the best part!

One organic chicken ( I used a 5 lb. Chicken)
1 large lemon (I used a Meyer lemon)
1 large clove garlic, chopped
2 handfuls of fresh thyme, leaves picked from stems and finely chopped (I used a bit of fresh rosemary along with thyme)
salt and freshly ground pepper
1/4 c. softened butter
Vegetables: chunks of potato (I used fingerlings), carrots, parsnips (they’re sweet and wonderful!), onions cut into quarters (if you do slices, they may burn), whole gloves of garlic if you like

Pre-heat the oven and an appropriately sized roasting pan to 425F. Wash your chicken inside and out and pat dry with paper towels. Using your fingers, part the breast skin from the breast meat. It’s important to try to push your hand gently down the breast, being careful not to rip the skin. With a zester, remove the fragrant yellow skin of the lemon, placing the peel in a bowl. Then add the softened butter, garlic, and whatever herbs you’re using. Season, then scrunch it all together. Push this into the space you have made between the meat and the skin - rub and massage any that’s left over in and around the bird. It’s all tasty stuff. Slash the thigh meat to allow the heat to penetrate a little more, which makes it taste better. Cut the peeled lemon in half and push it into the cavity. Prepare your vegetables by cutting them into approximately uniform sizes to cook evenly, season with salt/pepper, and pour them into the bottom of the roasting pan. Then put your chicken in the roasting pan and roast in the preheated over for 20 minutes. Stir the now-melted butter into the vegetables and continue to cook until the chicken is done. The whole baking process will probably take about an hour. Leave the chicken to stand for about 10 minutes before carving.

Sunday, January 3, 2010

Fettuccine, Linguine, Martini, Bikini...


It was a cold winter Saturday and I had a bit of time at home on my hands. I decided that a nice plate of pasta with homemade sauce sounded fabulous, so I paged through my cookbooks. I decided on a recipe from a Real Simple cookbook I have for Fettuccine with Bolognese Sauce. It's not too complicated a recipe. The most unusual ingredient is the pancetta, but even that was easily procured from Raley's grocery. I tweaked it to make it non-dairy and cut out the wine, and it came out delish! Best of all, there were leftovers for lunch, as well as enough to freeze and use later. Sometime in the next 3 months, I'm going to have a really easy dinner waiting for me in the freezer.


Fettuccine with Bolognese Sauce

Ingredients:

1 tablespoon olive oil
1 large yellow onion, diced
3 stalks celery, diced
1 carrot, diced
4 cloves garlic, minced
1/4 pound pancetta, chopped
1 1/2 pounds lean ground beef
2 cups beef broth
1 6-ounce can tomato paste
1 14 1/2-ounce can diced tomatoes, undrained
1/4 teaspoon red pepper
2 tablespoons chopped fresh oregano, or 1 tablespoon dried
1/2 cup fresh flat-leaf parsley, chopped
2 1/2 teaspoons kosher salt
1/4 teaspoon black pepper
1/4 teaspoon ground nutmeg

Directions

In a Dutch oven or large saucepan, over medium heat, heat the oil. Add the onion and cook for 2 minutes. Add the celery, carrot, and garlic and cook for 5 minutes more. Add the pancetta and cook for 5 minutes, then add the beef and cook until brown. Drain mixture and return to pan. Add the beef broth and the remaining ingredients and simmer for 45 minutes. Serve with cooked fettuccine. Sprinkle with freshly grated Parmesan if desired.